Thursday, May 20, 2010

Hidden Treasures


Here is my Hidden treasure Maggy

Wednesday, May 19, 2010

Tammy here

I started the drawing phase for the new challenge today. I love my idea, now to execute it. I just wanted to say Thank you so much for starting this group Shirley!
I am loving every minute of making the piece, and seeing the great ideas that others come up with.

Sunday, May 16, 2010

Miriam


Hi, I just finished making my lampshade. I like how it has turned out..........


Miriam.

The Next Challenge

As promised, and eagerly awaited by many of the participants, the next challenge topic is:

'The Four Elements.'


Thank you to Fran who chose the (scrambled) number.

Saturday, May 15, 2010

Hidden Treasures revealed

My entry to the theme of Hidden Treasures.

What I wanted to create was a piece where you didn’t see much at first glance. I wanted it to be camouflaged. The fabric I used just happened to be a piece that was left over from a bag I made recently. It is a blend of fibres possibly cotton with some nice shiny threads in it. The pattern on the fabric was quite wild and so I figured it would do.

To break up the piece, and to give the eye some rest, I took some black cotton broadcloth and distress dyed it with bleach.

I had done very little bleach dyeing before but this time I had a plan in mind. I wanted lines – some of which would intersect. I used a small paint brush to apply the bleach and I needed only about a one foot square part of the whole piece since I knew that I would be cutting it into one inch or one and one-half inch strips. I was quite pleased with the result after it was thoroughly rinsed and ironed. Different blacks turn different colours when bleached.

I knew that I wanted either a door or a window or some sort of opening that wasn’t ‘seen’ at first. Inside would be the treasure. Hence, Hidden Treasures. Since everyone has a different idea on what their ‘treasures’ were, I was stumped as to what to put behind each door or window. One thing that was definitely a treasure was love. All things are possible with love – love of family, love of friends, love of pets, etc. I then decided to just wing it and used a silver pen I purchased at the dollar store of all places and, using a stencil, I stenciled in the hearts.

For the other door/window opening, I just didn't know what to put in it. I googled Hidden Treasures, I asked my family what they thought of when I said hidden treasures. All the answers were different. I was stumped. One thing I did come up with from my daugher-in-law was that it should have colour. So then I thought of all of us and what treasures we use in our work. Colour, fabric, trims, lace, beads, notions, etc. Those are our tools and our treasures. It is what we use to compose our pieces and this is what I came up with.

Fabric, colour, lace, beads and some findings. I could have added a lot more, but that would have been overwhelming.

Here is the entire piece REVEALED.


This piece was totally machine stitched (except for adding the beads and findings) and nothing was really planned out as to what the size would be. It just grew on its own. The finished size is 21 x 13 ½ inches or 53 x 34 cm.

Cheryl's Hidden Treasure

When we were first given the theme for our first challenge piece, my mind was racing. My ideas were endless so settling on one was the biggest challenge of all. I knew somehow I would have to integrate my love for the sea into this project…but how? That is when I decided on My Secret Garden. Inspired by a trip to Tahiti, it incorporates an underwater oasis filled with hidden treasures I discovered right outside my back door.

My inspiration for this piece was this giant anemone (~ 24” in diameter)


Welcome to My Secret Garden...

Finished, it measures 24” x 38”.
The puffer in this garden is depicted just how I met him, face-to-face, coming around a reef. He was HUGE! I think I scared him more than he surprised me!

I consider the two Humu’s my personal tour guides of the reef. They spent the entire afternoon escorting me around. I believe they thought I was a giant version of them…my mask is a teal color…along with the white rash guard….


I am a newbie to the quilting art world, so my goal of trying something new was easy. The entire project was a learning process, and SO much fun!  This is my first landscape and my first attempt at appliqué. My final goal was to incorporate different textures into this piece:
  • The water is a satin piece embedded with beads and glitter (it came that way).
  • The anemone is crushed velour with eyelash trim for the tentacles.
  • I added Angelina fibers to the fins on the Humus. (always wanted to try it…next time I’ll read the directions)
  • The brain coral was made from a chenille yarn with my version of trapunto to give it depth.  
  • The sand is a microfiber suede.
  • The background reef is painted canvas.
I wanted to use thread painting to add depth and perspective but have since come to the conclusion that I need a lot more practice with my free-motion quilting and thread painting skills. Once these are refined I will go back and add more detail to the piece. That is why the anemone and the coral are pinned at this point.

I did not bind the edges as I have decided to build a frame (and distress the finish) to mount it in. The weight of the anemone and coral need to be stabilized.

I am excited to find out what our next challenge is!

Cheryl


DELIA


Hi Girls
This is my "Hidden Treasures".
Size 13" x 18"
II is brighter then this picture and when I get home I will take another and post.

I had no idea what I was going to do and then I though of little gems and sparkles that are found in the sea, on the earth, in the garden. Actually anywhere you look. I had a few mistakes with this piece.
First I ruched part of the yellow background but then I tried out my friend felting machine and put a lot of silk and wool in the one corner and felted strips down the piece. It then looked like an octopus. So under the sea. Still not right. I added some tyvek pieces that were painted with Lumiere paint (blue) and hovered the iron over these pieces to distort them.
On the organza that I used to cover the piece I machines 3 circles and stitched diagonally across each. I cut out the spaces and added a mirrors under.
In the top corner I decided to burn some holes with the heat gun after the organza had been place on the piece. After this I hand stitches around the holes that were formed. These looked quite good with the bright colour showing throw.
I then machine quilted down the pieces leaving space between the lines of quilting so I could cut out some areas.One area is the yellow area of ruching with hand stitching over the top. I also cut the area to show the tyvek and then fringed slightly the organza around this.


Cut out area with the yellow ruching showing through.
Tyvek cut out.


Holes burnt in the corner and then the holes stitched around and some bullion knots added.
I also used some glued gold foils and angelina.
I enjoyed doing this piece and look forward to the next challenge.
Delia

Sharon G

I am very new at this and just could not make up my mind.  I thought, "this could be anything and everything in some ways".  So I was talking to my daughter and I said that I thought I was going to go with the encyclopedia (?) and her response was well Mom just go with the flow so then I decided I learned and still do from books.  It has been my one constant source of knowledge so if I  went with words it would give me a little more to move around with.   My thought was that there are hidden treasures  in any given book or flyer etc that we read and what makes up those articles that we read and learn from  are words! 
Then I thought ok with words comes books, bookmarks, glasses, candles and just a bunch of stuff hence that is what I am trying to express in my first ever mind thought  into fabric.....lol
I found a tree of knowledge that had books hanging from it and for the first time did some thread painting...I really enjoyed this process but I need to be a little more steady I think.  I also weaved my background fabric to give it a wavy feeling and more motion.  The border I added to it was to represent stacks of books.
What I learned in this first ever was I need patience, but i also learned thread painting, printing on fabric, painting on fabric, the wonderful use of invisible thread and all the different stitches on my sewing machine.
Wow I cannot believe what a journey this was. I have to say I enjoyed it very much even if I was not sure of what I wanted to do.
I am so glad to be a part of this group and  am looking forward to learning and challenging myself in the months to come.

Diane

I've been fascinated by geodes since I was a small child. The first I ever saw was at my grandmother's house. I remember seeing the rock, which looked like any other rock, with a rubber band around it. But when the band was removed, and the two halves opened to reveal the sparkling crystals within, I was hooked. What four year old girl doesn't like sparkly things? I looked forward to playing with that geode every time we went to visit.

I had been planning a series of pieces made up of units that can be arranged, connected, rearranged, removed and folded up into three dimensional geometric shapes that hide something within, and I had been thinking of the series as "geodes". So for this Hidden Treasures challenge, I decided to do a literal interpretation of the geode. Each unit is a 6" high triangle that folds into a 3" tetrahedron with texture and sparkly crystals inside and plain rock outside. The assembled piece is 15.5"h x 6"w.

Diane


Anticipation - Gayle


This first challenge took me on an unintended journey. When the challenge topic was announced I had just purchased the book Out of the Box by Mary Lou Weidman. I envisioned my challenge as a folk art quilt with a dog digging up a bone. That might have been fun to do, however my thinking took a drastic step in a short time.
At International Quilt Festival in Chicago I had the opportunity to take a mixed media collage course from Rebekah Meier. Painting, stamping embossing, quilting – what fun! I decided that my challenge project would use some of the techniques I had learned in the workshop. What a great way to reinforce the learning and tweak it a bit by trying some different materials.
My ‘hidden treasures’ are things that ‘hide’ something that is soon to be revealed – mother-to-be, egg, cocoon, shells and a locket. The hidden items are fairly apparent, except for the one in the locket. The locket symbolizes developing love. I printed the picture on silk using Photoshop Elements. It is a picture that my husband took for a photo essay display in one of the conferences rooms at work – used with permission.
In completing this project I dry brushed fast-2-fuse with metallic paint and dabbed on a textile paint. I stamped sayings on organza and fused them to the painted base. I did a little stamping with colors and small stamps and added quilting to the base . Then I cut the base into the sizes I wanted to mount my treasures. These pieces were mounted on a small quilt . Angelina was placed between the treasure bases and the quilted piece.
Will I ever do the folk art dog and bone quilt? Maybe. Will I do more collage work? Absolutely. My 25 yr old daughter saw the piece and has requested a similar one in blue, with a picture of her that she selects. Another project to add to the list.
Gayle

Sharon M


I am so excited to be a part of this challenge group, it is definitely a new experience for me. This is also my very first blogging post. For our first challenge my personal goal was to create a picture with depth. I am not an artist and have limited drawing skills so I am pleased to have achieved the goal I set for myself. My hidden treasure is the treasures of the heart. In this attic room we see a woman who comes to open her heart strings as she spends a few stolen hours going through all her most valued keepsakes. She has boxes with her children’s school work from many years before, grandma’s favorite crystal dishes, doilies made by her great grandma and her favorite books. She listens to old records as she looks at photos in her dad‘s favorite chair. What was once her hope chest is now filled with old toys, knickknacks, the first quilt she made and her wedding gown.
To create my picture I started with a rough drawing of the room on a piece of muslin. I built the room by fusing my fabric onto the muslin and thread painted the floor so it would look like a wood floor. It took a lot of thought to make this feel like an attic room and I felt the best way to do this was with the floor opening. My fabric for the walls is carefully cut to give the room depth. The frame is done with embroidered designs and they symbolize the key to this woman’s treasure is her heart; the winged key because it is an eternal treasure. Shirley has given us many thread painting lessons and I have used her techniques for making my objects for the room. They are appliquéd onto a stiff base and then applied to the picture. I tried to create folds in the woman’s skirt by crinkling my fabric and fusing it. I have added some buttons for embellishment. It was hard to know when to quit adding items to my picture, I had so many ideas but given the nature of my treasure I tried to keep it as simple as possible.
I really enjoyed this first challenge and look forward to doing the next one!

Sharon M.

Jackie's Secret Treasure Challenge


I wrote a post but I'm not sure if I deleted it or not so I'll do it again.


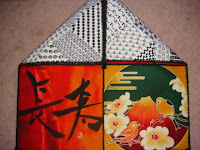
For the challenge, I was inspired by zentangles (see zentangle website). I started with a 18" square of white cotton and used the built in decorative stitches on my machine. Then I took 4 oriental panels, put them together and did some thread play. I put these on the back of the black & white zentangle square. I folded up the zentangle square and when you open the triangles, you see the secret treasure.

Hidden Treasures - Judy


My initial list of new techniques to explore with my challenge piece was too long and ambitious.  "Oh," thought I, "you could be opening a can of worms."  So I resolved to focus on stitching by machine and painting.
 
I liked the idea of adding to the needlework journal I started a few years ago (two pages started, none finished) and I had a template for the shape.  It measures about ten inches square.  I'll decide how to bind it when I have a few more pages.

I searched out all the textured, neutral fabrics in my stash, chopped them into rectangles and collaged and fused them onto batting and heavy-weight interfacing.  I like the texture that the close quilting adds.  I then mixed green paint with gel medium and gave the whole thing a wash, followed by some foliage-like streaks and stencilled posies.  I wanted the background to reflect the ungainly, cartoonish hen I had planned.  I threadpainted the hen (a first!) and finished just as I was getting the hang of feathers.  Is there a sweet little bluebird or a regal rooster to come? 


Joan Duggan

Here is my challenge. I've never posted to a blog before. It put my first picture (the whole quilt) last. The first two are closeups to show the hidden treasures- lots of sparkly little beads. I started with a one yard piece of hand dyed fabric that I had made. I completed the lower left rectangle first, which is about 9"x11". I had a lot of fabric left and it just kind of grew. I had the skein of green yarn that seemed to go well with it. I knitted the panels to give a textured sash between the blocks and crocheted the border. It is quilted with a satin stitch between the pieces. Altogether it is about 21" x 30".

Shirley


HIDDEN TREASURES

The first day, after the subject was chosen I decided to do baby hummingbirds, hidden in the leaves.

I remember as a child watching a humming bird's nest, and then the tiny tiny little birds arrived. The nest was the size of the an egg. I watched the parents feed their little ones - the Mother was so busy -- back and forth all day- such a busy little lady bird.


The idea wouldn't go away and I decided to go for it.

I tried different fabrics for the tree trunk but kept coming back to the brown. I cut out many many leaves and put them away to 'wait' for the babies. I drew the little nest with the babies' heads peeking out of the nest. I cut it out in grey, and placed it on timtex. Added some rope, little pieces of
yarn a bit of eyelash yarn for the nest. I then thread painted the birds and placed the whole nest on the branch of the tree. I then added many many leaves. (I fused dark green fabric with lighter green fabric for the leaves and cut them out. I also used some leaves I had bought a few years ago to give it a bit of life.

I decided to paint the hummingbird mother -- and fused it to some timtex to give it a 3 d
look. I had thread painted a hummingbird but I liked the effect better with the painted
bird.

I edged it with satin stitch, and will add some beading to the piece this week. This was fun for me. I also worked on a manipulated piece but couldn't figure out how to quilt it . I will put a picture in later. The second picture of my reveal gives you a close up of the nest and babies.

I am looking forward to our next challenge -- I have been fooling around with photo shop and have done some interesting manipulations. So, even though my first reveal was n't a huge reach, I did try some new things. I am looking forward to seeing the rest of the reveals.

I am so glad we started this group! It is something to look forward to and I am now wondering which challenge will be chosen for #2. Shirley


Reveal #1 Gudrun

Hidden Treasures of the Sea.

I discarded several ideas before I settled on the idea of the treasures hidden in the seas.  While working  on this piece, the latest & probably greatest,  man made ocean catastrophe to hit the seas was on the news. Very sad, very depressing.

The above picture is before any stitching, the background seascape, was once a shirt, the small coloured fish are fussy cut.  I trapuntoed the large white & blue fish, added bits here and there to give it some life.

The threads represent those tangled things that tend  to 'creep out' this swimmer.


I am well pleased with this little piece. Hope you all like it too.
Gudrun

Friday, May 14, 2010

Hidden Treasures - Sue M

 I like to think of bulbs as hidden treasures. Each year they emerge to fill the garden with their bright colours and perfumes.

I photographed a bulb and used the picture as the basis for this first challenge.

This is my interpretation of the daffodil bulb, it was drawn free hand. I have used free motion quilting and satin stitch.

The back ground is pieced from various creams and light browns.

The quilt measure 15.5 x 18 inches (approx 39 x 46 cm).
All cotton fabrics with cotton wadding.


A close-up of the stitching.

Miriam.........


Hi to all members of Challengingourselves..........


This has been a great experience for me. I love to work with sheer fabrics and tulle. I wanted to experiment with finding ther Hidden Treasure in the sea, which is the COLOURS.


I like to tear my fabrics for some of my projects. I layered my fabrics to blend them like the colours of the sea. I then stitched with threads of various similar colours, again blending.....


My first piece is a long wallhanging called THE COLOURS OF THE BEACH. This measures 50" wide x 9" deep.


My second piece was made in a similar way but then cut into triangles and reassembled into a Hexagon, which I then embellished with more torn fabrics. This is ccalled HIDDEN TREASURES and measures 21" from flat side to flat side.


I am currently working on a lampshade make using the same technique.....I will post a photo when it is finished.

It is now just after midnight - May 15th. I am posting this now as I will be gone from home very early tomorrow morning and wont be back till late evening...........


Miriam.

my challenge piece, finished! Tammy


I love the ocean, and all it offers. There are so many hidden treasures that we don`t even know them all. When life gets to me, it is the peace of mind and body that the warmth of the water, the soothing sounds that comfort me. If I could choose what I wanted to be in my next life the sea turtle is what I would pick. Too float along the waves, diving deep, and then resurfacing to the warmth of the sun. aaaahhhhhh peace!
That is why I chose my subject.
The film showing the changing moons with the eggs under the sand, and then the wondrous sea turtle emerging from them. I used real 35mm film on the reels, crocheted coloring for the border to remind us of the colors of the ocean.